How to Run LLM Locally on Mac: A Step-by-Step Guide
Quick Summary
Learn how to run large language models (LLMs) locally on your Mac to enhance privacy and reduce reliance on cloud services. This guide walks you through the tools, configurations, and best practices for a seamless setup.
Want to Learn How to Run LLM Locally on Your Mac?
Running large language models (LLMs) locally on your Mac can unlock powerful AI capabilities while ensuring privacy and performance. Whether you’re a developer, researcher, or AI enthusiast, learning this process opens doors to experimentation and enhanced workflows.
In this BoltAI guide, we will walk you through the steps and tools needed to set up an LLM locally, bypassing the limitations of cloud-based services. From installation to best practices, you'll gain the knowledge to make your Mac a powerhouse for running advanced AI models.
Why Listen to Us?
At BoltAI, we specialize in making AI integration seamless and efficient for macOS users. Our expertise spans years of optimizing AI workflows for developers, researchers, and creators who value privacy and performance.
Trusted by over 7,000 professionals daily, BoltAI enables streamlined local LLM setups that prioritize user control and security. Our hands-on experience with tools like Ollama and LM Studio ensures you’re learning from experts who understand the unique challenges of running AI locally on macOS.
What is Running an LLM Locally?
Running a large language model (LLM) locally on your macOS device unlocks a whole new level of AI performance—private, fast, and fully under your control. Say goodbye to cloud dependency and hello to enhanced data privacy, reduced latency, and the freedom to work offline. Perfect for professionals who value speed and customization, this setup brings AI right to your fingertips.
By tapping into your device's hardware, local LLMs process queries without an internet connection. Sure, setting it up might take a little extra effort upfront, but the payoff is huge: no recurring cloud-service fees, no limitations, and a system you can fine-tune to your exact needs.
Benefits of Running an LLM Locally on Mac
Running a large language model (LLM) locally on your Mac offers unparalleled advantages for privacy, control, and efficiency. Here's why it matters:
- Enhanced Privacy: Local LLMs eliminate the need for data to be sent to external servers, ensuring sensitive information stays secure. This is crucial for professionals dealing with confidential material.
- Offline Accessibility: With a locally-run LLM, you can access advanced AI capabilities without requiring an internet connection. This ensures uninterrupted workflows regardless of network issues.
- Cost Savings: Avoid recurring subscription fees for cloud-based services by leveraging your existing hardware for AI processing.
- Customization: Tailor LLM configurations to meet specific requirements, from fine-tuning models to optimizing for unique tasks, all under your control.
- Optimized Performance: Macs, especially with M1 and M2 chips, support high-performance frameworks like Core ML, delivering faster and more energy-efficient AI computations.
How to Run LLM Locally on Your Mac
Method 1: Running an LLM Locally Using the Traditional Approach
Step 1: Install LM Studio
To get started, you need to download and install LM Studio, a user-friendly application for running large language models locally on your Mac.
- Download the Application:
- Visit the LM Studio website and download the installer compatible with macOS.
- Ensure your Mac meets the minimum system requirements for smooth operation.
- Install LM Studio:
- Once the download is complete, locate the installer file in your Downloads folder.
- Drag and drop the LM Studio application into your Applications folder.
- Open LM Studio to ensure the installation is successful. If prompted, allow necessary permissions.
By completing this step, you’ll have LM Studio ready for use, setting the stage for configuring and running an LLM locally on your Mac.
Step 2: Choose and Download a Model
Now that LM Studio is installed, the next step is to choose and download a suitable language model to run locally.
- Browse Available Models:
- Open LM Studio and navigate to the Models Library section.
- Browse through the available models, such as GPT-based models or lightweight alternatives like Mistral or LLaMA.
- Select a Model:
- Choose a model based on your requirements, considering factors like model size, performance, and compatibility with your tasks. For general-purpose tasks, select a versatile model like GPT-3 derivatives.
- Download the Model:
- Click the Download button next to the model you’ve chosen.
- Allow time for the model to download; larger models may take longer. Ensure a stable internet connection during this process.
- Verify Compatibility:
- Confirm that the model is compatible with your system's hardware, especially if you’re using an older Mac or have limited resources.
This step equips LM Studio with the core model needed to process tasks, bringing your local LLM setup closer to completion.
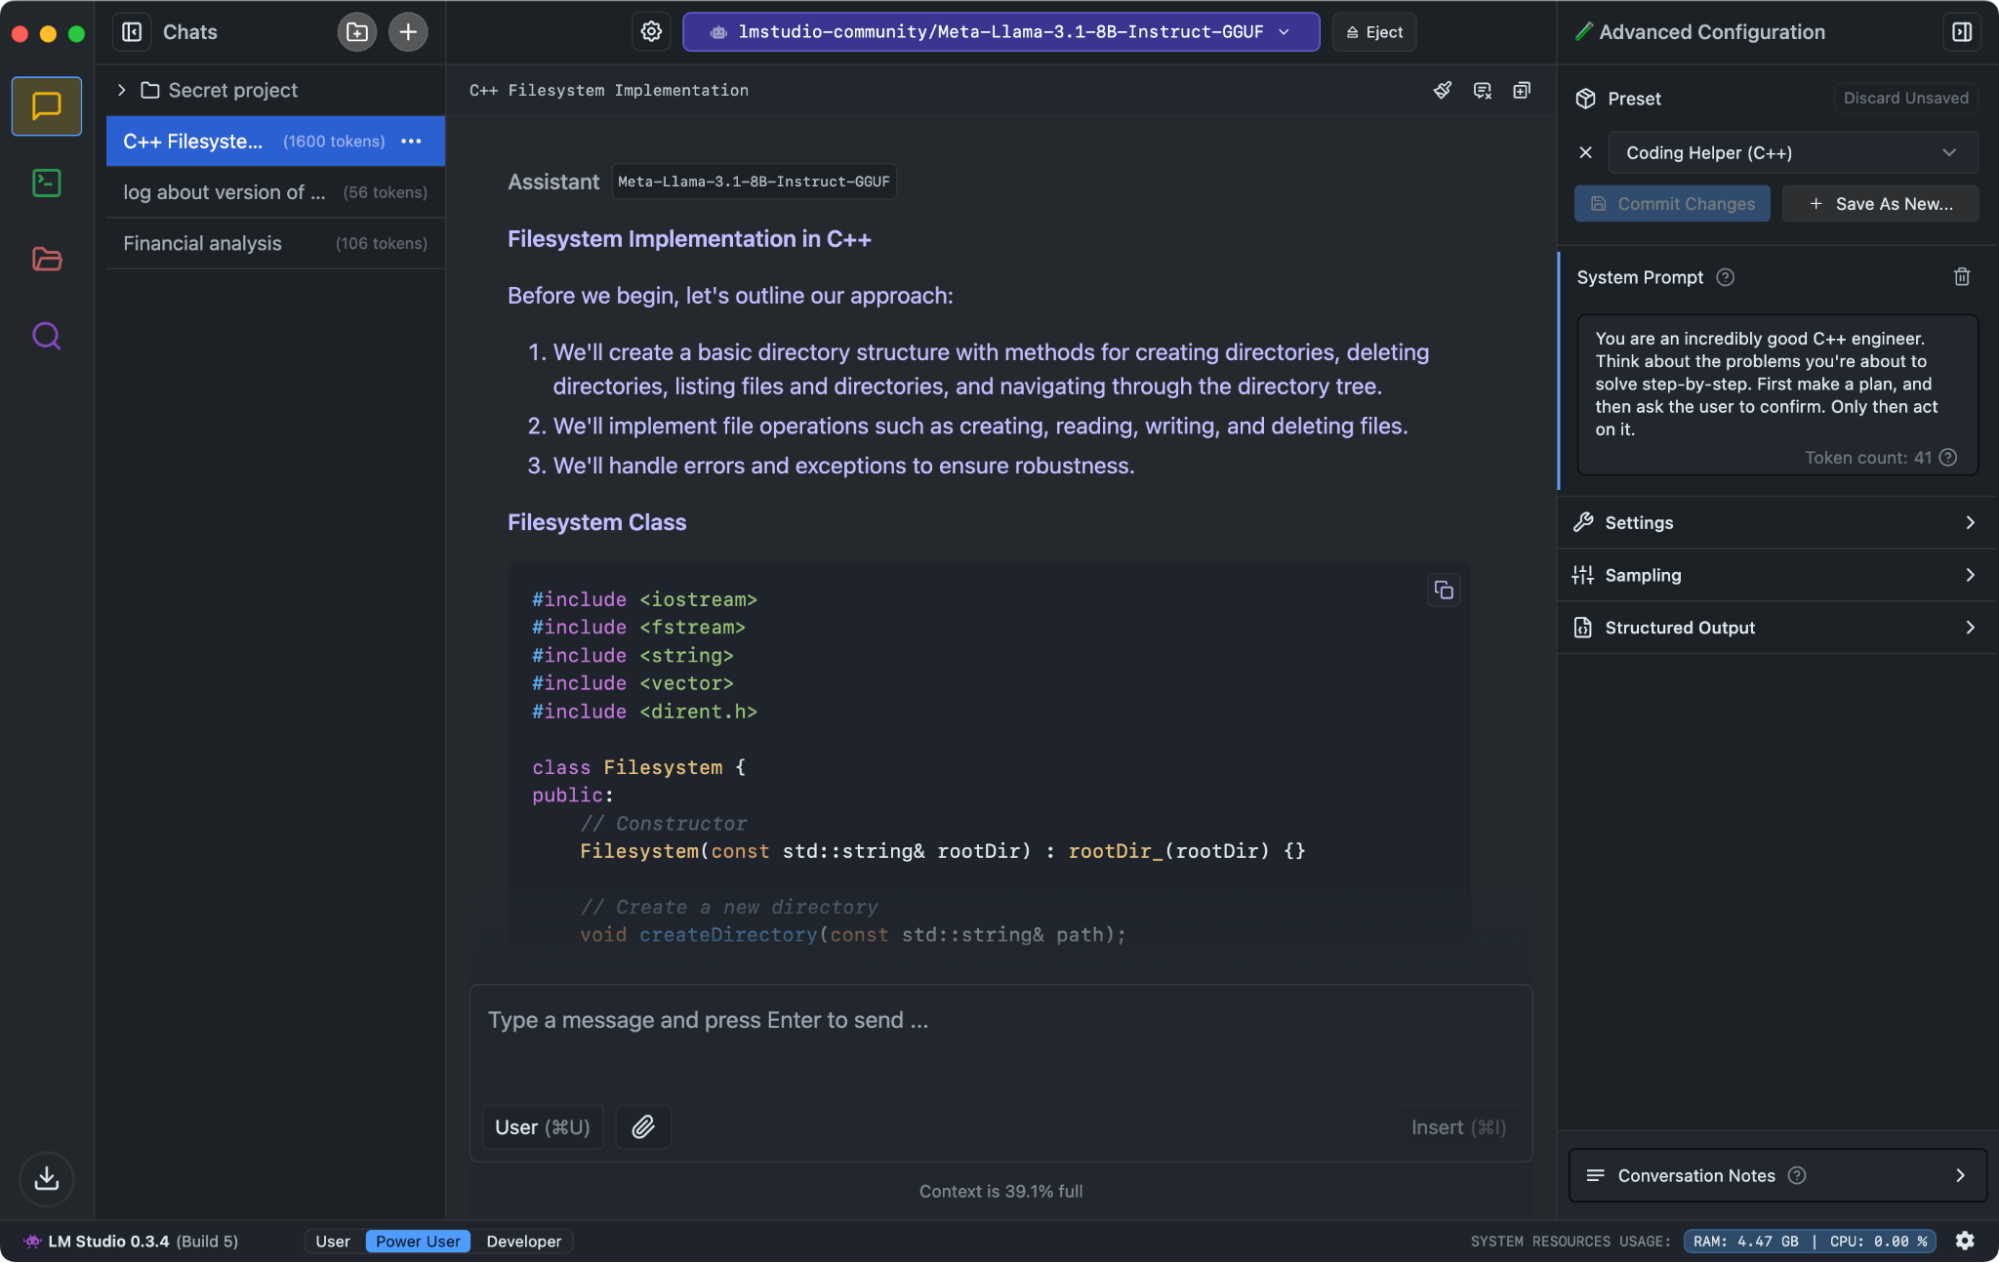
Step 3: Configure the Model
Once the model is downloaded, it's time to configure it for optimal performance and usability in LM Studio.
- Load the Model:
- Open LM Studio and go to the Models tab.
- Locate the downloaded model and click Load to initialize it.
- Set Runtime Parameters:
- Adjust settings such as context window size and token limits to suit your use case.
- For resource-constrained devices, reduce the context window to improve speed and responsiveness.
- Optimize Performance:
- Enable GPU acceleration (if supported by your Mac).
- Navigate to Settings > Performance and toggle GPU options to offload computations from your CPU to your Mac’s GPU.
- Test the Configuration:
- Run a sample prompt to verify the model is working correctly.
- For example, ask it a basic question like, "What is the capital of France?" to check its response accuracy and processing time.
Proper configuration ensures the model performs efficiently and meets your specific requirements, laying the groundwork for seamless local operation.
Step 4: Run Your First Query
Now that your model is configured, it's time to put it to use by running your first query.
- Open the Interface:
- Launch LM Studio and navigate to the Query Console or Chat Interface tab.
- Input a Prompt:
- Type a prompt into the input field. Examples:
- "Summarize the main points of this text: [paste text]."
- "Explain quantum computing in simple terms."
- Process the Query:
- Hit Enter or click the Run Query button.
- The model will process your request and display the result in the output window.
- Refine Your Prompt (Optional):
- If the response isn’t satisfactory, tweak your input for clarity or specificity.
- For example, add constraints like "Answer in under 100 words" for concise outputs.
Running your first query validates the entire setup, letting you test the system's responsiveness and accuracy. It also provides a baseline for adjusting settings to suit your tasks better.
Step 5: Optimize and Fine-Tune the Model
To get the best performance out of your local LLM, fine-tuning and optimization are essential. This step ensures the model aligns with your specific needs and operates efficiently.
- Adjust Model Parameters:
- Modify parameters like temperature, token limits, or response length for tailored outputs.
- Experiment with values to balance creativity and accuracy.
- Monitor Performance:
- Use task-specific prompts to test how well the model performs in your typical workflows.
- Track response times and adjust hardware settings if needed (e.g., allocating more GPU/CPU resources).
- Install Add-Ons or Plugins:
- Enhance functionality with third-party libraries or extensions compatible with your model.
- Examples include integration with local apps, web scraping tools, or file analyzers.
- Set Up a Workflow:
- Create scripts or macros to automate repetitive tasks.
- Save frequently used prompts in a query library for quick access.
- Troubleshoot Issues:
- Refer to community forums or official documentation for troubleshooting common problems.
- For errors during execution, check log files generated by LM Studio or the LLM interface.
- Back Up Configurations:
- Save your model configurations and fine-tuned weights to prevent data loss during updates or system changes.
Optimizing the model ensures a smoother and more effective workflow, making your local LLM a powerful tool for everyday tasks.
Method 2: Running an LLM Locally with BoltAI
BoltAI simplifies the process of running an LLM locally on macOS. This method is ideal for users who want advanced AI capabilities without complex setups. With BoltAI, you can seamlessly integrate local LLMs into your workflows, ensuring privacy and efficiency. Let’s dive into the steps to get started.
Step 1: Download and Install BoltAI
Begin by installing BoltAI on your macOS device. Our tool provides a streamlined interface for managing LLMs.
- Download BoltAI:
- Visit the BoltAI website and download the latest version for macOS.
- Open the .dmg file and drag the BoltAI app to the Applications folder.
- Launch BoltAI:
- Open the app and follow the on-screen setup instructions.
- Grant necessary permissions, such as Accessibility and Filesystem access.
BoltAI simplifies the installation process, enabling quick access to advanced AI tools. Once installed, you're ready to set up your local LLM.
Step 2: Set Up a Local LLM Using Ollama with BoltAI
BoltAI’s integration with Ollama makes it simple to run powerful local LLMs like Llama 2 or Mistral. Follow these steps to configure and connect:
- Download and Install Ollama:
- Visit Ollama’s website and download the latest macOS version.
- Install Ollama and ensure it runs in the background (you’ll see its icon in the macOS menu bar).
- Connect Ollama to BoltAI:
- Open BoltAI and navigate to Settings > Models.
- Click the + icon to add a new model, and select Ollama from the options.
- Refresh the model list to detect available local LLMs, then choose your preferred one (e.g., Mistral).
- Test the Connection:
- Start a new chat in BoltAI, ensuring the selected AI Service is Ollama.
- Input a simple query to verify the model runs locally without issues.
If you are new here, BoltAI is a native macOS app that allows you to access ChatGPT inside any app. Download now.
